photographing a Christmas tree lighting in Rochester, Minn
‘Tis the season when communities gather for the annual lighting of the Christmas tree….fa la la la la…
Even if you don’t live in New York City where the masses huddle around Rockefeller Center, chances are pretty good that the event that you attend will still be crowded. Cold. And dark. Not exactly the best time to be messing around with your camera settings trying to figure out how to photograph the festivities.
A couple nights ago I attended the annual lighting ceremony in Rochester, Minnesota. And yep, it was cold, dark and crowded. Returning home, I put together 5 tips for photographing a Christmas tree lighting in your community.
1. Choose your background.
Most people just think about the tree. But get there early to scout out the background you want in your shots. It makes a big difference! Scan for something harmonious or at least non-competing with the tree before the crowd hems you in. In Rochester’s Peace Plaza, everyone was gathering near the intersection to watch the mayor light the tree. But I didn’t like the background– which was a bunch of stores with distracting signs, jarring colors and logos. Instead, I walked behind the tree, where there were far less people, so that the tall Mayo Clinic building became my background. I liked the pattern of the uniformly lit windows as a backdrop to let the tree shine.
2. Crank up the ISO.
While it’s still light, raise your ISO. Know how high you can crank up the ISO on your specific camera without adding too much noise. On my Sony a9, I can easily increase the ISO to 1600 without any noise degrading the images. Even at a high ISO you’ll need to shoot with a wide aperture to allow enough light in. I shot between f/2.2 and f/4 that night, with a corresponding shutter speed of 1/125 and 1/30 using a 50mm lens.
3. Sandwich your composition.
You’ve selected your background for the tree. Now think foreground. What can you include to give your photo a sense of place? Depth? What’s unique about the city? For example in NYC, you could include skaters on the ice skating rink in front of the tree in Rockefeller Center. That definitely says NYC. Wherever you are, try to find something or someone to include in the foreground. If you simply zoom in on the tree itself, well, you could be just about anywhere!

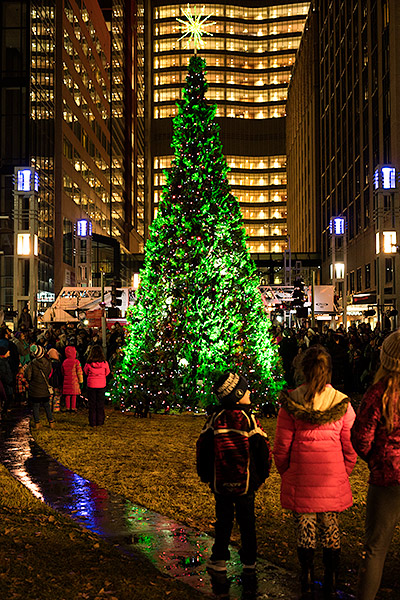
Choosing my composition, I saw a couple of kiddos to frame in my foreground. They aren’t in sharp focus since the tree is the main focal point (at f/2.2 your depth of field will be very narrow), but that’s OK. Included, the kids tell the story about the tree lighting event. Who better to portray the magic of Christmas?
4. Before & After shots.

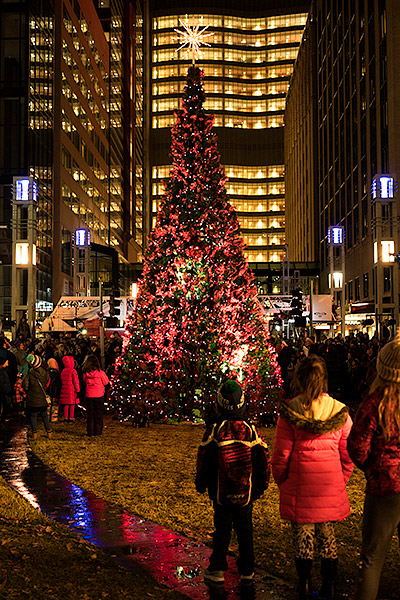
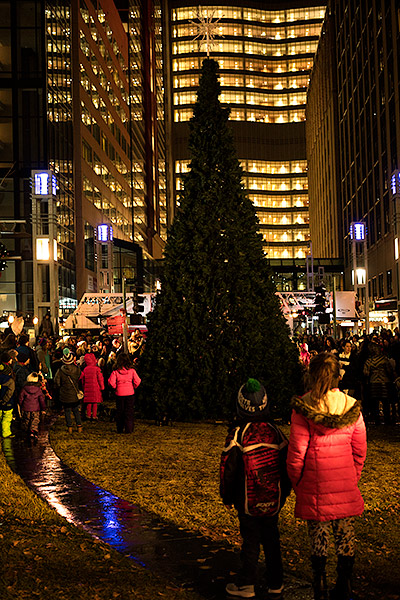
Once in position, take a shot before and after the mayor lights the giant spruce and the crowd erupts into applause. Nice to show that contrast. Nuff said.
5. Play!
If you brought your tripod or can set your camera on a stable surface, experiment with the shutter speed. Adjust your ISO back to 400 and slow down the shutter to 1/4 sec to 30 seconds to see variations of blurred people moving around the lit Christmas tree. (I had neither–no tripod or stable surface around me. And my tribe was hungry. So I didn’t get to play.)
But maybe you can!
Come to think of it, this was my first Christmas tree lighting ceremony. Ever. Hmmm. Do you routinely seek them out? Well, if you do, I hope this gives you a tip or two about photographing a Christmas tree lighting in your own neighborhood or wherever you happen to be traveling through. And let me know where your favorite Christmas tree lighting was–I’d love to hear about it!


