

Ah, the beach… is there any place more popular for families during Spring Break or summer vacation? Warm sunshine, soft sand, bright skies…kids swimming in the ocean, jumping waves, building sand castles, collecting shells… Some great photo opps, no doubt, but capturing them can be surprisingly challenging. I don’t know how many times I’ve heard parents say, “None of my pictures turned out, even though it was plenty sunny!”
The biggest challenge (aside from salt water and sticky sand damaging your camera equipment!) is actually the sun. On a wide open beach there is no diffusion from the sun. So unless there are thick clouds in the sky, the resulting light from the bright sun will be very harsh, creating deep shadows and bright highlights. This contrasty light makes photography difficult as the camera cannot capture the extremes of the brightest brights and the darkest darks in a given scene. Photograph a person in this light, and see ugly shadows and hot spots appear. Or watch a person’s identity completely disappear.
But look at the difference on a cloudy day. This is what you want!! See how the clouds provide a wonderful diffused light on the overall scene at Coco Beach? No harsh shadows anywhere. Just nice soft light on skin tones.

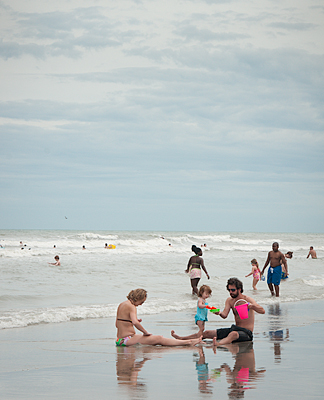

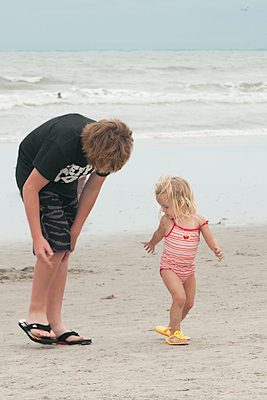
Notice that the only shadow on the sand is the slight diffused one under the boy’s flipflop.
But if your skies are bright and featureless with a hot direct sun, what do you do to compensate? Well, you could wait for a cloudy day, move your kids off the beach to stand under the diffused shade of a palm tree, or only shoot during the magic hour of sunrise or the hour before sunset. But c’mon! You’re on vacation! Kids will be sleeping in…going to the beach at midday…then getting cleaned up for dinner…
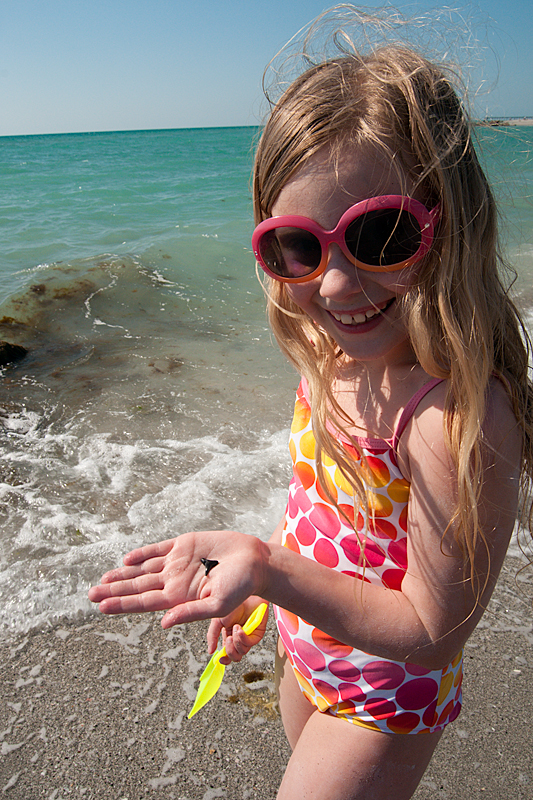
Chances are, you’ll be photographing your kids in less than ideal situations, like I was. On Florida’s Gulf side last week we didn’t have a single cloudy day at the beach. See the picture below? The sun, directly overhead at midday, created a bright spot on Jordan’s nose and left the rest of her face in shadow. Her hand is properly exposed, but so what? Yes, the shark tooth that she found is the subject of the photo, but the rest is just too distracting…crooked horizon, dirty looking water, harsh shadows, hot spots, messy hair…

To improve the shot, the first thing I did was analyze the position of the subject to the sun. Obviously the above position wouldn’t work. So I moved to other side of my daughter while she was busy sifting through another scoop, and maneuvered my position so that the sun was shining down on her from the other side and slightly behind to remove any bright spots on her face. I also cropped out the sky which was featureless and added nothing to the scene. And to compensate for her face now being in the shadows, and to soften the rest of the harsh shadows a bit, I added fill flash. I didn’t have my strobe with me, so I just used the pop-up flash set to -0.7.

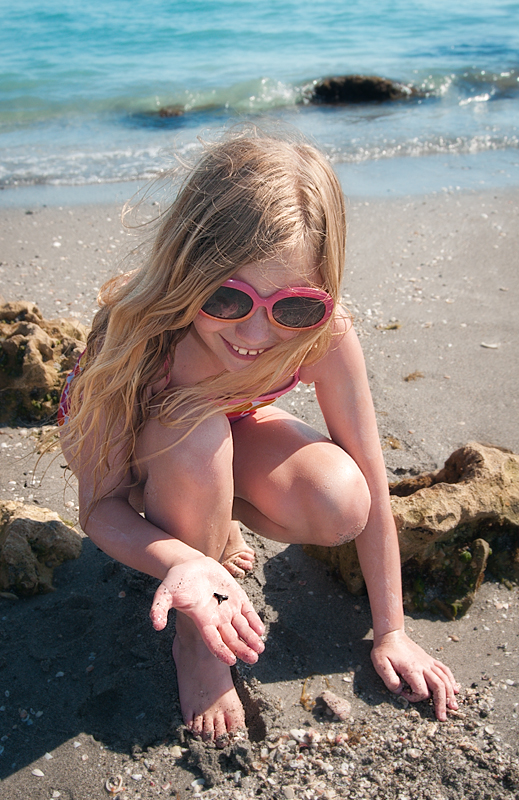
This photo keeps the emphasis on the shark tooth, as it is still the brightest spot in the picture. The other elements are more evenly lit and pleasing. In post-processing, I softened the contrast of the water to keep the emphasis where it should be, on the subject. By the way, in case you’re wondering…Venice Beach is one of those hidden gems in Florida! The five public beaches were practically deserted–despite being Spring Break. Beautiful curved bays, blue herons strutting about the rocks, soft sand, AND the top place to find prehistoric shark’s teeth!! Located 77 miles south of Tampa, right off Interstate 75, it is very easy to get to. (Unlike Clearwater Beach, located 20 miles west of Tampa which took us 2.5 HOURS to access, due to insane traffic on the congested causeway!)
If you go: the best beach for finding shark’s teeth is the furthest one south, Caspersen Beach. The best time for finding them is after a storm. Otherwise you have to work a little harder to find smaller ones that drift in with the tide. (They rent metal strainer contraptions at the bait shop outside of Sharkey’s restaurant on the pier, but a plastic toy shovel works great too.) Despite being calm and sunny, my daughter found 13 little shark’s teeth. Venice itself is a small laid back town with many wintering snowbirds from the midwest, so no crazy wild Spring Break party atmosphere here. Main street is made for strolling. Outdoor cafes, ice cream shops and souvenir stores line the shaded streets. We enjoyed our overnight stay here immensely and would go back in a heartbeat.

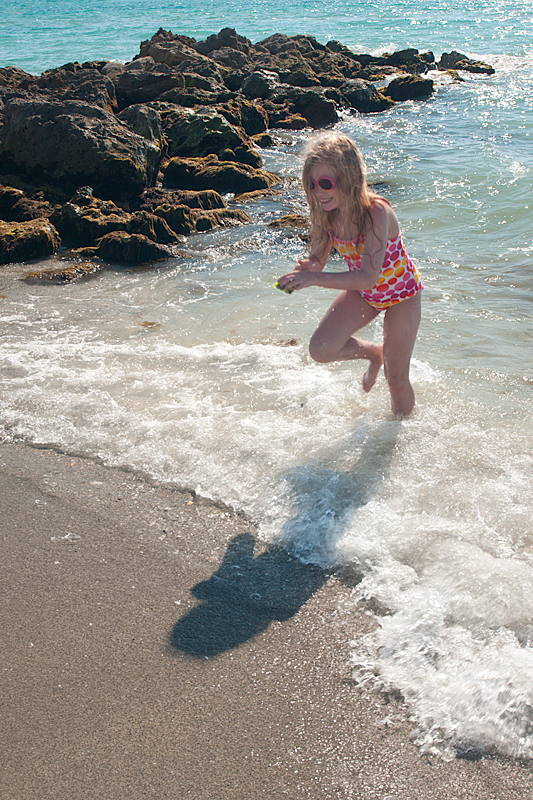
I maintained my postion here, but stepped back a few feet to capture her running in with a fresh batch to sift through. You can see the position of the sun by her shadow. Again, I used my pop-up flash but at greater power (+1.0) to compensate for the increased distance from the subject. Shooting backlit subjects tends to create rather flat light, so tweaking the contrast in Lightroom or Camera Raw becomes a necessary adjustment. Compostion-wise, I liked the diagonals of both the water and the rocks. By the way, this location near the rocky point on Caspersen Beach was the premeire spot for finding shark’s teeth.

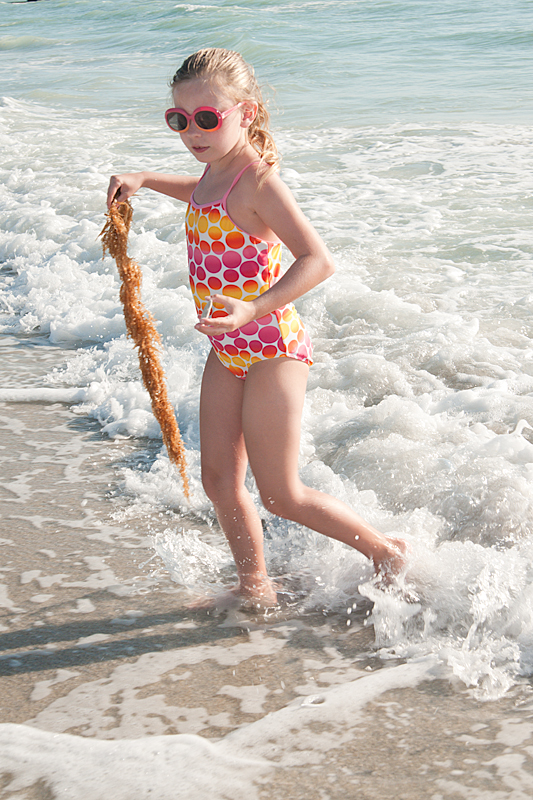
This time, another beach but continued fascination collecting things from the sea… You’ll notice that I kept the same position but was closer to my subject. The ambient light was a bit softer so I reduced the output of my pop-up flash to -0.7 to provide a little fill. The flash and the faster shutter speed allowed me to capture her action. The second image is sharper than the first as she is not running as fast. Camera settings for both shots above: f8, 1/200, at 200 ISO.

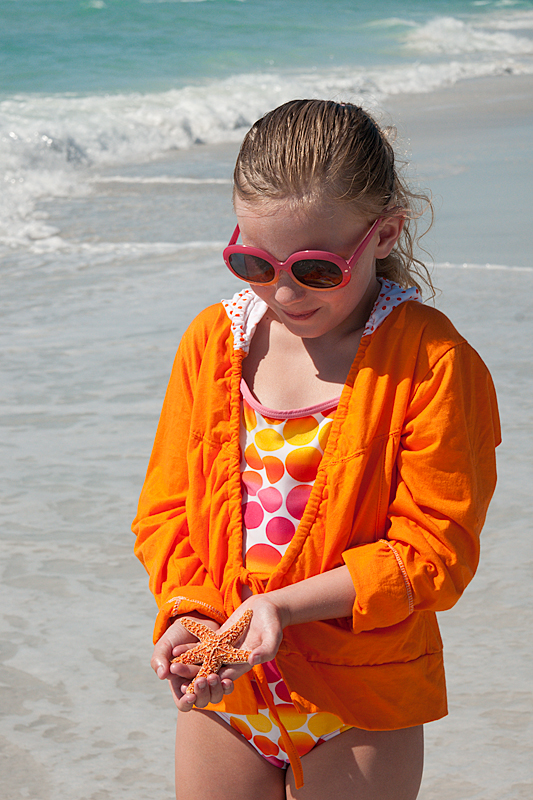
I liked the background on this shot of her holding a starfish. Muted colors, diagonal line of waves…but I didn’t like the lack of separation between the subject–the starfish–and the rest of the elements that were the same tone, or the harsh shadows across her face.

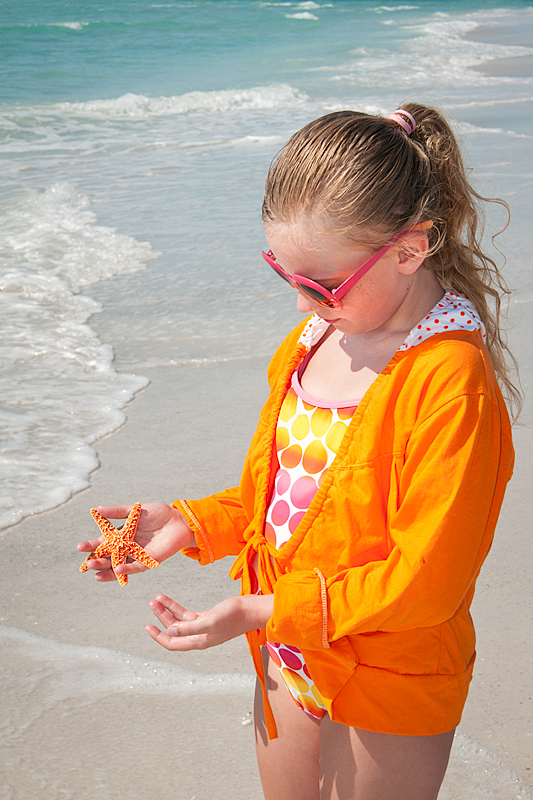
So I changed my position slightly, moving to her side so she was now 3/4 in my frame instead of head on. Now her face, especially her forehead, was more evenly lit from the sun. The starfish also stands out better against the sand and separated hands (did it wiggle?) instead of against her orange cover-up. The only other change I made, other than my positioning, was adding a little fill flash from my camera’s pop-up. I don’t remember the flash power, but it looks rather bright, so may have been full power (+1.0). Had my daughter given me another chance, I would’ve decreased the power to -0.7 to remove that annoying bright spot on her swimsuit. But she was already running toward her pail… Camera settings for both shots: f/11, 1/200, at 200 ISO.

.jpg)
On the way to dinner one early evening, we stopped by a place I read about on IgoUgo.com called Bean Point on Anna Maria Island. As we approached the beach, Jordan noticed the seagulls, and I noticed the interesting light patterns cast between nearby trees in the setting sun. The magic hour! All I had to do was position my daughter into one of those rays of light and ask her to face me instead of the sea.

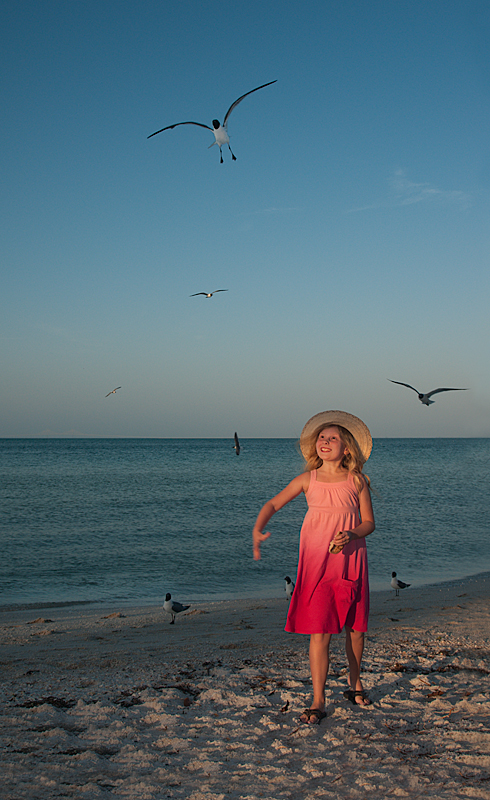
I simply waited for the decisive moment, and added a little flash (-0.7) to help freeze her movement. Camera settings for both images: f/5.6, 1/200, at 200 ISO.


Sunset. That special time when the sun disappears and so does your subject. There is no way your camera can handle both exposures. When you meter on the sky just left or right of the setting sun, and underexpose the ambient light by a couple of stops to capture the scene as you saw it, the subject becomes nothing more than a silhouette.


But if you expose for your subject, the sky becomes washed out and highly overexposed. And that’s not what you saw!


If you want to capture both, use a flash. To make the scene more realistic, place a CTO gel (an orange colored cellophane film) over the flash head. This warms up the flash output to match the warm tones of the setting sun (if the sky is really orange you may want to double up on the CTO gels). Otherwise, an ungelled flash will produce a cool neutral light on your subject, and stick out like a sore thumb.
To diffuse the light from the flash so that it would spread out to cover her from head to toes, I bounced my gelled flash into my Wescott 5-in-1 reflector. Ideally, it’s best if you have a helper who can hold the flash and reflector off to the side a bit to angle the position of the light–or set up your camera on a tripod so you can stand where you want to angle the light from the flash. But since I was shooting without a tripod or helper at this deserted beach (was David already eating shrimp cocktail?), I propped the reflector against my legs and shot pretty much straight on. I held the camera with my right hand, and aimed my off-camera flash into the gold side of the reflector with my left hand. As far as power settings on the flash, I like to use manual power. Usually start at 1/4 power, and move up or down depending on what I see on the back of the digital screen.

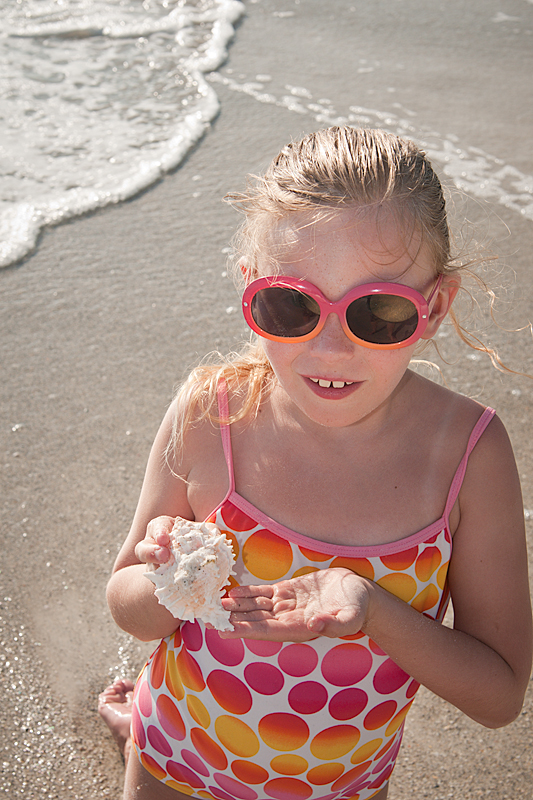
This parting shot is another image where I used a reflector, this time during the middle of the day. (You can actually see it reflected in her sunglasses!) Sitting with the sun behind her, but not directly overhead, she has nice highlights outlining the right side of body and hair. But her face needed a little illumination. So I propped open my gold sided 5-in-1 reflector, held it near her knees and angled it up toward her face. The sun reflected a soft golden glow on her face and added some vibrance to her colors. I like the effect, and am kicking myself for not bringing my reflector to the beach until that very last day! It is such a handy tool to have–it creates such magical light and doesn’t have to be babied at the beach like a flash or camera. No danger if it gets wet or sandy.
The intense direct sun was certainly the biggest photographic challenge last week! But analyzing the direction of the sun, changing my position to my subject, adding fill flash or using reflectors to photograph people make such a difference, and allowed me to capture our fun-loving daughter at the beach.
Amazon carries both gels and 5-in-1 reflectors. To learn more about gels click here: gel pack. I like that I can collapse and carry in the outside pocket of my camera case, or when I remember, to throw in a beach bag.



Roger & Ja Neal Smith - We loved seeing the pictures on the beach. Very good pictures. It looks like something we would like to do sometime.